When I first started sewing printed spandex suits, or "subdyes" two years ago, all I had to go off of as a guide was one simple graphic.
Along the way I made a lot of mistakes and eventually found a process that works for me. So I'm putting it into what I hope is a detailed guide so that the next person, whoever you are, can have an easier sewing experience.
First you want to use a strong poly thread and a machine with a stretch stitch. I recommend creating a double seam, just in case something pops open during wear. But if you use a good thread with the stretch stitch, that shouldn't happen.
It all starts with the "butt seam". Don't sew up the leg inseam until you sew that butt seam, this prevents ugly bunching of the fabric in the crotch area and if you are sewing a male suit this makes putting a zipper into the inseam for ease of toileting easier.
After the butt seam, you should be able to sew the leg inseams from one toe all the way up then down to the next toe.
After this you can attach the back pieces to the tops of the bottom portion in the back.
Next, sew up the side seams and attach the shoulder pieces (if you are doing a mask you should have it done, I don't sew suits with masks). The curvier part of the shoulder pieces attaches to the back and the straighter edge attaches to the front.
After that you will have your arm opening ready to attach the sleeves. This is also when you would add 7" zippers to the sleeves
After the sleeves are attached, put in your back zipper. Every suit I have sewn has used a 22" hidden zipper. I use the back waist seam to tack down the end of the zipper. For more info on sewing hidden zippers into stretch fabrics, check out this video, it was by far the most helpful one I've seen,
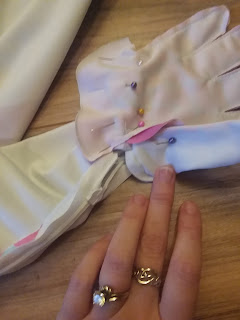
Once the sleeves are on, you can begin the gloves. The gloves are the most generously sized part of the costume and have the biggest seam allowance. Sew the thumb pieces to the palms, then pin the palms to the back.
If you have a sold colored suit with no stitch lines, place a hand on the wrong side of the palm and mark or trace your hand to make a guide. You can go bigger and resize them smaller. The 4 way stretch makes godets unnecessary. Sew the fingers and DO NOT cut them apart, slip the opposite hand inside and see how it fits and adjust it if you need to. Once you like the fit you can cut them apart and trim the excess off.
Next attach the other half of the thumbs to the back of the glove and them you can sew the inside seam on the thumb and connect it to the index finger. Put your hand in and mark this area if the seam is deep enough and adjust as needed.
Now you are ready to close off the sleeves at the wrists, there is usually some extra fabric here or there, and some last adjustments on the fit.
If your suit is maskless, then now is the time to create the neck hem and adjust the fit if it needs to be tighter and more fitted.
And you're done! The suit is ready to wear. It's ready to install shoes in or paint.


